27 August 2017

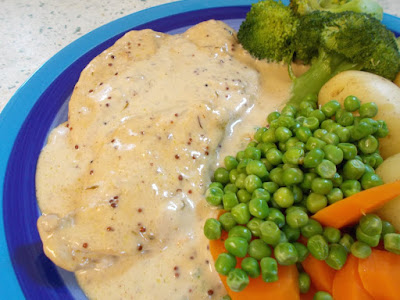
Chicken in a Marsala & mustard cream sauce - as easy as winking!

Chicken in a Marsala & mustard cream sauce is quite probably my absolute favourite chicken dish from my repertoire. I've used Marsala wine, our home made Mead and even sherry in it, with excellent results for all three. I've also swapped out the wholegrain mustard for Dijon and loved that version too. So, it's a very flexible and forgiving recipe that provides incredibly yummy results.

Right at this moment, I'm on a white meat only diet following on from a really bad gout attack and I'm so glad that I remembered this one. Eating just chicken, turkey and white fish can get a bit ho hum, even after just a week. So it was nice to have chicken with a lovely unctuous, tasty sauce and I'm only surprised that I haven't got around to blogging it before now!


Another good thing about this recipe is that if you ever find yourself with no onions but a tub of cream in the fridge and chicken in the freezer, you're half way there. It's not often, these days, you find a recipe that doesn't include onion. I've often pondered on including a sauteed onion or maybe some garlic in the sauce but always reject the idea on the basis that the sauce is so good without it, why mess with perfection?


As for Cook's Notes, there's really only one you need to be aware of which is to monitor the temperature of the pan when you're frying the chicken. Of course, you don't want your chicken to burn, but equally you really don't want it to be more than a gentle golden brown or your sauce could end up a little bitter. It all depends on your particular pan. You know it best, so just keep your eye on it during the cooking.

Mmmmnnn, I could eat this all over again today if I had the chicken!

CHICKEN IN A MARSALA & MUSTARD CREAM SAUCE (serves 3)

Ingredients :

3 boneless, skinless chicken breasts
a pinch of sea salt
1 tbsp olive or rapeseed oil
120ml Marsala wine (or Mead, or Sherry)
2 tsp wholegrain mustard
100ml water
1 tsp low salt chicken stock granules (or half a low salt stock cube)
a pinch of ground black pepper
1 tsp thyme
150ml double cream
1 tsp cornflour, let down with a small amount of water.

Method :

Trim each chicken breast of any gristle or fat, then slice each breast through horizontally from the thick end to the thin end, creating two thin halves.

Place the olive or rapeseed oil into a frying pan and heat until sizzly. Gently lay each chicken breast down - and leave it alone apart from to sprinkle with a small amount of sea salt. You are aiming to achieve some colour on the chicken breasts, so they will need to stay in one position until they achieve a lovely golden colour.

Flip each breast over onto the other side and again, leave it alone to cook and gain colour for another few minutes.

Remove the chicken to a warmed plate, it doesn't matter if it isn't quite cooked through - it will finish cooking once it is in the sauce.

Pour the wine into the pan and deglaze by stirring and releasing any crispy bits that may be stuck to the pan. All these are flavour!

Once the wine has reduced by half, add the mustard, water, stock granules, black pepper and thyme. Stir thoroughly to combine.

Add the cream and stir through, then return the chicken to the pan, together with any juices that have accumulated under the chicken. Stir gently and allow the sauce to simmer.

When you are satisfied that the chicken is cooked through, if necessary add the cornflour/water mix and stir to combine. Once the sauce has thickened to your preferred consistency, serve with a selection of steamed vegetables and new potatoes.

Printable version

12 August 2017

Reduced sugar Lemon & Courgette Loaf - perfect with a cup of tea

If you are anything like me and enjoy a good ramble through recipe websites and magazines, you can't help but have noticed the trend towards including vegetables in sweet cakes and loaves.  I think it has largely come over from the States, but I also can't help thinking that perhaps this is what used to go on during the war when sugar was rationed and cake ingredients were at a premium.

Anyway, this was my first go with including courgette - and it's very good!  With the lemon in there too, you don't notice the courgette flavour but it has a distinct effect upon the texture of the cake/loaf.  (I can't help but call it a cake, because it looks so much like one and tastes so much like one!  However, the original recipe touts it as an American breakfast bread.  Well, considering cornbread, I suppose it fits!).  This is a very robust cake in that the texture of the cake crumb is almost bouncy.  Not rubbery, it just has a degree of resistance to the tooth, without being dry or crumbly.  I like it a lot.


My lovely Facebook friend Ann recommended the loaf to me - for which thank you very much, Ann!  The original recipe came from the Lemon Tree Dwelling blog (see here) - where, incidentally, it is referred to as a "bread".


Now, along with trying to reduce our consumption of carbohydrates (Conscience : "Oh yes? Why are you making cake then, Jenny, eh?", me : "Shut up and get back in your bed!"), we have also been trying to reduce our consumption of processed sugar.  That's a real tricky one where sweet baking is concerned.  I won't entertain the use of lots of the sweeteners that are out there today - and particularly not anything with aspartame or acesulfame in it. However, we have found that Truvia (a stevia based sweetener) is acceptable.

Hence, you will find that the ingredients include a quantity of Truvia along with a much reduced quantity of caster sugar.  The original quantity of sugar is 0.75 of a cup, so if you want to make a full sugar version - there you go.  :)  That may also help you in calculating how much of another sweetener of your choice, you are likely to need.

Oh and yes, because this is an American recipe (originally), the ingredients are in cups. All I can suggest is that if you haven't already, you get yourself a set of cup measures.  SO much easier than trying to convert from cups to grams!


One other thing - the original recipe says to use vegetable oil.  Because I'm me and butter tastes SO much nicer, I just melted the right amount of butter in the microwave and used that instead.  ~proud face~  What?  It was low calorie enough, alright?

Right then, excuses over, I thoroughly recommend you give this recipe a try.  Make sure to have it baked and iced before cup of tea time in the afternoon, right?  You'll be glad you did.

REDUCED SUGAR LEMON & COURGETTE LOAF   (makes around 12 slices)

Ingredients :

One and a half cups of plain flour
A half tsp bicarbonate of soda
A quarter tsp baking powder
A quarter tsp salt
A third cup of Truvia

A quarter cup of caster sugar
1 cup of finely grated, unpeeled courgette
A quarter cup of melted butter
1 egg
2 tbsp lemon juice
2 tbsp finely grated lemon zest

For the drizzle icing :

Half a cup of icing sugar
1 tbsp lemon juice
1 tsp lemon zest

Method :

Prepare a 1lb loaf tin by either greasing and lining with baking parchment, or by use of a ready made loaf tin liner.  Pre-heat your oven to 180degC/350degF/Gas 4.


In a medium mixing bowl, combine the flour, bicarbonate of soda, baking powder, and salt.  Stir them together thoroughly and set aside.

In a separate, large, mixing bowl combine the Truvia, sugar, grated courgette, melted butter, egg, lemon juice, and lemon zest. Stir to combine.

Add the contents of the dry ingredients bowl to the courgette mixture and stir just until combined.  You may need to add a wee drop of warm water, if the mix appears too stiff.

Spoon the mixture into your prepared loaf tin and level the surface.

Bake for 50-55 minutes or until golden brown and a skewer comes out clean.

Cool in the pan on a wire rack for a few minutes, then remove the loaf from the pan and cool completely.

Once cool, combine the ingredients for the icing and drizzle over the loaf.  Allow a little time for the drizzle to dry - while you're making a cup of tea is about perfect.


11 August 2017

Cheese making post no. 1 : Cream Cheese

This marks the beginning of a new venture for Rhubarb & Ginger - cheese making!  Not your actual cheddar (although I don't rule anything out!), that's a bit advanced for me just yet. No, I'm starting with soft cheeses.

You see, for my recent birthday my hubby bought me all the extra paraphernalia I needed for cheese making - cheesecloth, a digital thermometer, some vegetable rennet and the very important book of recipes. The book came from Lakeland and is written by Gerard Baker, a chef who I have seen on t.v. on occasion but who has more recently been on active duty as a chef and lecturer in Antarctica!

Home made cream cheese with smoked salmon & cucumber panino
So, getting back to the cheese.  I chose this recipe for Cream Cheese to start with as it seemed fairly simple and I could pretty much guarantee that so long as the cheese at the end of everything was good, the menfolk would eat it. All of which is fairly critical as I suspected we were going to have quite a bit to wade through!

The process itself is really very simple, which is nice.  You do need some particular items in order to make clean, untainted cheese - such as stainless steel pots, pans, a colander and cutlery, glass bowls, cheesecloth and a digital thermometer to ensure that the milk mixture reaches the right temperature. You also need to ensure that everything is absolutely spanking clean and free from all chemicals, so rinse - rinse everything copiously with clean water.

My first go - edible but unexceptional
Now I will admit that this was my second go at making cheese - the first one was a bit of a failure.  However, it was worth the failure as it taught me a lot about how to heat the milk, what quantities I can easily cope with and what to expect from the curds themselves. I shall pass on as much as I can in this blog post, so that your first go will be rather more successful.

So, the initial process is to heat the 500ml of whole, full fat milk and 500ml of single cream (light cream in the USA, table cream in Canada) together in the one pan. You're not heating it very much, just to 29°C, so the easiest way (avoiding the possibility of burning the milk on the bottom of the pan) is to employ a Bain Marie style arrangement with a pyrex bowl containing the milk/cream mixture sat on the top of simmering water in a pan underneath. This way, if the contents heat too quickly or too much, it is easy to remove from the heat.  In fact, my milk/cream zoomed up to 34° at the speed of light and I had to place the bowl in a sink of cold water to bring it back down to the right temperature.  Ah well, live and learn.

Home made cream cheese with smoked salmon and cress
oven bottom muffin
It was important to reduce the temperature as the next step was to add the live yoghurt (I used Yeo Valley yoghurt and very nice it was too!) and had the milk/cream been too hot, it would have killed the live cultures within it.  So, in goes the 200ml yoghurt and half a teaspoonful of diluted rennet.  Make sure to stir gently but regularly so that the rennet is mixed in quickly and effectively as it begins working quickly.  One of the things I learned in my first attempt with rennet was that my rennet - it is vegetable rennet - is very weak.  As a result, I used twice the amount required.  You will only know how your rennet performs by using it, unfortunately.

Following 30 minutes of exercising of what little patience I possess, I took a look inside the bowl.  Honestly, the satisfaction of finding a bowl full of coagulated curds and whey is quite ridiculous and almost as good as the next stage of cutting the curd.  It is worthwhile popping your (very clean) little pinky finger into the curd to check whether it splits cleanly before cutting the curd.  If it doesn't break cleanly, leave it for another 15 minutes or so until it does.


The next stage, cutting the curd, is my favourite bit.  ~shrug~  I have no idea why. Anyway, find yourself a super-clean, fine bladed, stainless steel carving knife type of knife and cut the curds into squares (well, rectangles in fact, but they look like squares from the surface!).  Believe it or not, this helps to release the whey from the curd.

A word about cheesecloth.  If you're using a new piece of cheesecloth, it is essential to give it a good rinse through to ensure that any loose threads have been cleared before using it in anger.  I usually do this bit before doing anything else and leave it sat on the side in a dish.

So the next bit is to line your stainless steel colander with cheesecloth and place it over a big bowl.  Then gently spoon the cut curds into the cheesecloth. About now, you should start feeling a little bit like a cheese maker.  *chuckle* Immediately, you will see the whey begin to drain from the curds - which is what you're after.  If you're in the U.K., you can probably leave the cheese out of the fridge for the next six or seven hours as it drains.  However if you live somewhere hot, it's best to put it in the fridge.  Good luck with finding room for a large bowl and colander in the fridge.  We had to play some serious fridge tetris to get ours in!  Take a look at it from time to time and drain off the whey.  I kept mine and drank it with a little cherry syrup added.  Major lushness.

You will need to put the cheese into the fridge overnight (complete with colander and bowl), however at around the 8 hour mark, it is worthwhile very gently turning the sides of the curd to the middle, just to ensure that the centre of the curds get to drain properly.  I did this just before it went into the fridge.  Sneak a flavour now too - isn't it divine?


The following day, simply peel the cheesecloth away from the cheese curds and spoon them into a storage bowl with good fitting lid.  Hey presto - your cream cheese is ready for use.  Break out the smoked salmon and celebrate, you're a cheese maker!

The yield you will get depends entirely on the degree of milk solids in your milk products.  I'm afraid I can't tell you how much mine made because we'd eaten a third of it before I remembered I should have weighed it.  I guess if you think of a standard 180g pack of Philadelphia cream cheese, I must have made approximately four of those - so around 700-800g in total.

What all this fuss has been about - home made cream cheese!

Another thing is your milk.  Without doubt, raw milk is the best.  However, finding it is like finding rocking horse poo.  So don't be worried about using homogenised, pasteurised milk - it's what I used.  So long as the cream is accompanying the milk, the cream molecules will be able to help the homogenised cream molecules work in the required fashion for cream cheese.

I suppose I'd better provide a smaller, more concise version of the above recipe, *chuckle*, but I'd recommend if you're new to this process, you read all the above before getting cracking.

CREAM CHEESE   

Ingredients :

500ml whole, full fat milk
500ml single cream
200ml live plain yoghurt
0.5 tsp rennet, diluted in 15ml warm water.

Method :

To begin with, rinse a large piece of cheesecloth through and place to one side in a bowl.

Place a large pyrex bowl over the top of a saucepan containing a small amount of simmering water.  (Or use a double boiler, if you're lucky enough to have one)  Add the milk and cream to the bowl and slowly bring to a temperature of 29°C (84°F) stirring gently all the time.

Remove from the heat and stir the yoghurt into the milk mixture.  Mix the rennet with the water and stir them into the milk mixture, making sure to stir right through to the bottom of the bowl.

Set the bowl aside in a warm place for 30 minutes.  The milk should have coagulated into curds and whey.  Test the curds by inserting your pinky finger to break the curds.  If they break cleanly, proceed to the next step.  If a bit of a ragged break, leave the curds for another 15 minutes.

Take your knife and gently cut the curds in a chequer board pattern, so as to create squares.

Line a stainless steel colander with the rinsed cheesecloth and set it over a large bowl.  Gently spoon the curds into the centre of the colander.  You will see the whey begin to drain.  Set the cheese aside to drain, checking it from time to time and emptying the bowl of whey.

At the end of some 8 hours (or overnight), gently fold the cheese from the sides to the middle, so as to help the draining process.  Place the whole lot (colander, bowl and all) in the fridge overnight or until the curds have virtually stopped draining.

Spoon the drained curds into a super-clean, lidded storage container and plan your lunch.

Printable version

10 August 2017

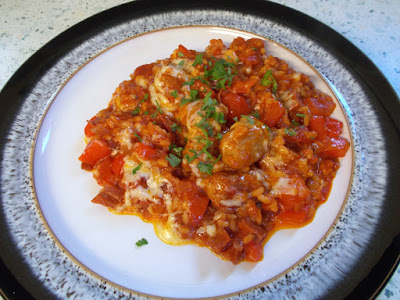
Sausage & red pepper Mexican rice - one pot, big flavours!

Some time ago, I received some fairly intense instruction from my lovely friend Deb Barragan on how to make Mexican rice to accompany things like burritos, enchiladas and fajitas.  I think she was fed up with keep seeing potato wedges, chips or savoury rice appearing alongside such things.  *chuckle*

Since having acquired the knack of Mexican rice, I discovered  a brilliant recipe that included grated cheese over the lot.  You can only imagine how much my menfolk approved of that.


So when I was contemplating this week's meals, I remembered that I had a complete shed load of Spanish rice in the cupboard.  Immediately the "plus cheese" Mexican rice recipe came to mind and, instead of thinking of something to go alongside, I began to think about what could go inside.  Bacon was rejected.  I know, but still, it seemed too salty.  Sausages were the next idea - and skinned sausages made into meatballs seemed perfect.

I also wanted to include some sort of vegetable matter in the mix and just happened to have a red pepper going begging.  A bit like the small amount of finely sliced sandwich chorizo that was going begging from the cheddar & chorizo quiche and the end of a chorizo sausage that was also looking for a job to do.  (I skinned and quartered that!).  So in a funny kind of way, the recipe made itself just by thinking about what would go with what - and what I already had in the fridge!


There wasn't enough rice to say that this was risotto-like, but it did have something of a risotto quality to it as the creamy rice grains held everything together and gave it a reason to be there.  The addition of the grated cheese at the end just turned what was a tasty thing into a delicious thing and gave it heaps of appeal where the menfolk were concerned.  I liked it a lot.  We didn't have any accompaniments with ours - we're trying to cut down on portion sizes and definitely cutting down on carbs, so garlic bread was a no:no.  Personally, I think it would have been lovely with a green salad with balsamic dressing, whereas my hubby was after a bit of bread to mop up the sauce with.  So go with what your menfolk and/or conscience decrees!

As for Cook's Tips, there are a couple included in the recipe.  However aside from that, it is worth noting that the Harissa paste I used includes cumin in its recipe so I left that ingredient out.  It's worthwhile checking yours and doing the same, if so.


Another tip involves the tinned tomatoes.  For those of you in the U.K., by far and away my favourite type of tinned chopped tomatoes are from the Tarantella brand.  They are organic and as such a wee bit more expensive than lots - but the flavour and lack of acidity is just streets ahead.

Well, there you are.  All that remains is for me to wish you good cooking and you to make your menfolk very happy.  Oh - and you may want to up the Harissa content if you and/or your menfolk are dead keen on food that makes your nose glow.  *wink*

SAUSAGE & RED PEPPER MEXICAN RICE    (serves 3)

Ingredients :

1 tbsp olive oil
8 pork sausages, skinned and each separated into 4 small meatballs
90g thinly sliced chorizo, cut into ribbons or small pieces
1 red onion, chopped small
2 garlic cloves, finely chopped
1 red pepper, cored, de-seeded and diced small
1 tsp dried oregano
1 tsp Harissa paste
1 tbsp tomato puree
1 tbsp tomato ketchup
1 tsp cumin powder
1 tsp chicken stock powder or 1 chicken stock cube
400g tin chopped tomatoes
8 cherry tomatoes, halved
180g Spanish rice (Paella rice is good for this)
300ml hot water
150g mature cheddar cheese, grated
3-4 slices of Mexicana cheese
1 tbsp finely chopped parsley as garnish.

Method :

Begin by heating the olive oil in a large, deep frying pan or wok (one with a lid) over a high heat.  Once good and hot, add the sausage meatballs and fry until a deep golden brown on at least three sides.  Spoon away and discard a good two thirds of the ensuing oil from the sausages.

Add the chorizo, onion, garlic and red pepper and stir fry - it's quite important to keep the pan contents moving with occasional pauses - until the onion is softened and there is a degree of juice evident.  Add 50ml of water to the pan and cover it.  Continue to cook, covered, for around 5 minutes or so.

Once the peppers have begun to soften, uncover and add the oregano, Harissa, tomato puree, tomato ketchup, cumin powder (if required), chicken stock powder, chopped tomatoes and cherry tomatoes and stir gently to combine.

Reduce the heat to moderate and add the dry rice.  Stir gently to combine and make sure that each grain is covered by the flavoured oil, then add the water and gradually stir it in.  Replace the lid and simmer for approximately 20 minutes until the rice has cooked.  You will need to remove the lid and stir the contents from time to time to prevent the underside from burning.  A little sizzle is good - and to be recommended in Spain - so I tend to leave that until the last couple of stirs.

Once the rice is cooked and the liquid has reduced, turn off the heat, sprinkle the grated cheese over the rice, lay the Mexicana on top and don't stir for the next 5 minutes.

Serve onto warmed plates and garnish with the chopped parsley.  You can either serve it as it is, or with bread to mop up the sauce, or even with a green salad.

Printable version

8 August 2017

Cheddar & chorizo quiche : a super-tasty surprise!

For some reason I decided to make a quiche. I haven't made one in literally ages and I don't really have a reason for it. But I was considering what to make for dinners this week and up popped "quiche" in my head. Well, it seemed like a good idea - particularly if I got some ready made pastry, that would make it a lot easier. So I did.  You can make your own pastry if you wish - feel free!  On a good day, so would I.

I already had some finely sliced chorizo in the freezer, left over from a paella. The idea of some good, mature cheddar with chorizo seemed to have merit. Ultimately, I also added some char-grilled red pepper - just a little bit - and a handful of chopped fresh parsley.  I also had a rush of blood to the head and added a teaspoonful of vegetable stock powder (bouillon, in other words) and I'm glad I did.  It didn't make a huge difference to the flavours, but it just savouried (is that a word?) everything up nicely.


The big difference with this quiche is that I took it upon myself to use sour cream.  I figured that the slight sourness of the cream would work well with the rich cheese and smokeyness of the paprika in the chorizo and so it did.


I think this is one of the best quiches I've made in a very long time.  I wasn't sure how it would all work out, but it worked out perfectly. Definitely a "do-again" quiche.

I have two Cook's Tips for you - firstly, there is no failure to using shop bought, ready rolled pastry.  It's quick, it's so simple to use and these days there are some really lovely tasting ones out there.  I got mine from Asda and it's perfectly acceptable.

Secondly, don't be tempted to skip the part-baking of the pastry case. It really does help to eliminate those soggy bottoms that can make quiche eating something of a trial.  All you need is some greaseproof paper and a pot of ceramic baking beans (or a quantity of dried beans - my Mum used hers for years and her pastry had an unmistakeable nuttiness because of them). It only adds 20 minutes to the baking time and in that time you can be making the filling. As the Nike ad. says, "just do it!".

Anyway, to the recipe!


CHEDDAR AND CHORIZO QUICHE   (serves 4-6)

Ingredients :

Approx. 300g shortcrust pastry (sufficient for an 8" flan dish, approx. 1" deep)
4 large eggs
250ml soured cream
a good pinch of ground black pepper
1 tsp vegetable stock powder (or vegetable bouillon powder)
40g finely sliced chorizo, sliced into small ribbons
50g mature cheddar cheese, grated
2 spring onions, sliced diagonally
1 tbsp char-grilled red pepper (from a jar), rinsed and sliced small
1 tbsp fresh parsley, chopped fine.

Method :

Your first job is to part-bake the pastry case.  So, pre-heat your oven to 180degC/350degF/Gas 4.  Then, cut a square of pastry that is significantly bigger than the baking dish or tin you will be using and gently sink it into the tin, making sure there are no bubbles under the pastry and it is pressed gently into the corners.  Trim off the excess with a sharp knife.

Cut a piece of greaseproof paper that is correspondingly bigger than the baking tin and crumple it up as though you're going to throw it away, then smooth it out again.  You'll find when it comes to laying it over the pastry, it will fit better now!  Lay it over the pastry and lightly smooth it across the base.  Pour in your baking beans in an even layer.

Place the tin centrally into the oven and bake for 20 minutes.  You can use this time to make the filling.

Break each of the eggs into a cup and pour them into a large bowl.  Doing this ensures that if one of your eggs is off or even slightly dodgy, you don't lose the lot!  Add the soured cream, black pepper and stock powder and give everything a good whisk to combine.  Add the chorizo ribbons, grated cheese, red pepper, spring onions and parsley and stir until everything is combined.

Remove the pastry case from the oven and gently lift out the baking beans by holding the greaseproof paper.  Set the baking beans aside to cool down.

Using a slotted spoon, spoon the solids from the mixture into the pastry case and distribute them around evenly.  Pour the leftover liquid into the pastry case.  You may find that you have slightly more than will go in - and better to do it this way around than find your quiche is full of egg mixture and there's no room for the chorizo!

Gently place the quiche into the oven and bake for 30-35 minutes, until the filling has risen, turned golden and feels fairly firm when pressed.

Remove from the oven and place onto a cooling rack for 5-10 minutes.  If your tin is a loose-bottomed one, you can now remove the quiche from the tin and place it back onto the cooling rack.  Serve whilst still a little warm with a crunchy garden salad.

Printable version

Change - it's a good thing, right?


I have come to a conclusion.  Now don't worry, it's not an earth-shattering conclusion, nor will it affect Rhubarb & Ginger in a bad way.  In fact, I'm hoping it will be good for the blog!

What I have decided is that I will, in future, not always spend so much time describing and chronicling the processes that go into a recipe.  You see, I am finding typing for lengths of time considerably more of a challenge these days and this has been putting me off from posting.  The end result of which is that you have been missing out on some fabulous recipes - and I've been missing out on recording them for future reference!

Of course, that doesn't mean I'm not going to wax lyrical over some of them.  I mean, after all, I have good days! *wink*  However, if you find a short preamble to a recipe don't think it's because I don't care, or that the recipe is somehow not a good one.  No, it's just that my hands hurt, so I'm making it short.

So, having said all that, onwards and upwards! 


Related Posts Plugin for WordPress, Blogger...